~ 9 min read
How to Remove Swirls from Car Paint
Are there unsightly swirls in your car’s paint? If you own a car, chances are, you have.
Swirl marks will be the most common car paint defect that you’ll see. It is not surprising that “how to remove swirls from car paint?” is one of the most frequently asked questions in the car detailing process.
Swirl marks can be described as a collection of minor scratches that look like real scratches when examined under a microscope. These marks often appear on your top layer of paint. Swirl marks are most commonly caused by improper washing and drying.
Swirl marks can also cause paint to contaminate rapidly, making it more challenging to maintain a spotless car. You will spend more on maintenance if you have a lot of decontamination. You must get rid of swirl marks as soon as possible.
Let’s learn more about swirl marks and how to remove them.
What causes swirl marks?
Swirl marks are caused by improper drying or washing techniques & these include:
Using Only One Wash Bucket
Most car owners only use one bucket of soapy to clean their vehicles. Instead, use a separate bucket with fresh water for each pass of your sponge or mitt. This will eliminate dirt and other corrosive substances from your sponge or mitt, reducing the chance of getting swirl marks.
Neglecting a Pre-Wash (Rinsing)
A sponge or wash mitt might be better for cleaning your car. This will cause swirl marks and contaminants to be transferred to the car’s surface. Pre-wash your vehicle with a pressure washer if you can. These contaminants will be removed without causing damage to your paintwork.
Harsh Cleaning Products
Swirl marks can also be caused by harsh cleaning products. For example, towels and applicators made with polyester threads can leave visible swirl marks over time. Avoid using paint cleaners and powerful polishing agents, as they can scratch the top layer.
Not drying the car properly.
Use a clean towel to dry your car. Use a soft, clean towel to dry it.
Using an Automated Car Wash
Swirl marks can also be caused by automated car washes. As they wash multiple vehicles daily, rotating brushes can collect grit and grime. Micro-scratches may be left on your car by the rotating brushes. Avoid taking your vehicle to an automated car wash if it is new.
Where Do Swirl Marks Commonly Appear?
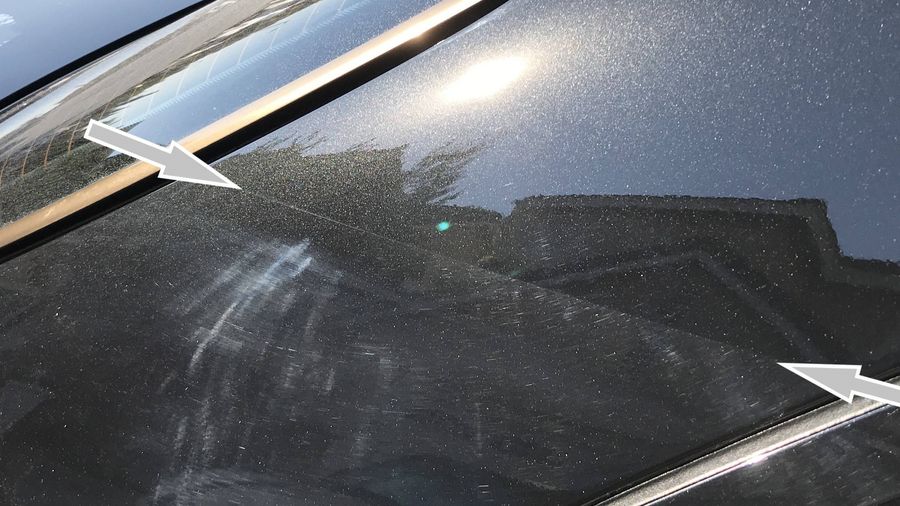
Swirl marks may be found all over the vehicle’s surface. They are most common on flat surfaces such as trunks, roofs, or hoods. They are less likely to appear on the sides of your vehicle.
Dark-colored cars are more likely to show swirl marks. This is why black is the most common color. You might notice swirl marks on the doors and fenders of dark-colored cars because they are easier to see.
However, swirl marks can still be found on cars painted in light colors. They may be visible on a white sedan but are less noticeable because light-colored paint reflects light more. Because it is hard to see swirl marks in direct sunshine, they are more evident in shaded areas and if the car has been wet.
How to Identify Swirl Marks
You must first learn to identify swirl marks before removing them. While the average person may be unable to tell the difference between scratches and swirl marks, a professional detailer should. There are several distinct characteristics that distinguish swirl marks from regular scratches. Here are the facts.
Swirl Marks:
- They look like spiderwebs or cobwebs and have a consistent diameter.
- These are the most prevalent types of paint defects
- Only appear on the surface of the clear coating
- Do not scratch the paint surface
Scratches:
- They can have completely random patterns and shapes
- Commonly from a deep gash or sharp objects such as keys or rocks
- Deeper than just swirl marks
- Paint’s color layer is often affected.
- It may be go all the way to the primer
- Sometimes, the bare metal is revealed
Swirl marks, unlike scratches, are typically only 2-4 microns in depth. They don’t penetrate any deeper than the clear coat of paint.
There are also many types of swirl marks:
- Wash Marrings: These defects are represented as straight lines or swirls, and the extent of damage varies by depth and area.
- Dual Action Haze (Micro Marrings): These are distinctive swirl marks. Because micro marrings are hairline swirls marks, they are easier to see under direct light sources (sunlight and fluorescent).
- Buffer swirls: These marks are thicker than the other types. They are easier to see in bright or white fluorescent light because their diameter is more consistent.
How to Remove Swirl Marks?
While prevention is better than treatment, swirl marks cannot be prevented. To remove minor swirl marks, you can use a scratch-and-swirl remover tool. This is the fastest way to remove swirls. Professional results can be achieved with most scratch-removal tools.
If the problem is more serious, you must know how to remove swirl marks. This is a step-by-step guide to getting rid of swirls.
Step 1: Wash your car
Washing your car well is the first step to removing swirl marks. You will see more swirl marks if dirt, contaminants, and other substances get trapped in the outer layer. Start by pre-washing the car using a pressure washer. This will get rid of all dirt and contaminants without having to touch your vehicle.
The two-bucket washing method can be used to clean and dry your vehicle. Take care of these things while washing your car.
- Use a mild soap for car washing.
- Start at the top and work your way downwards.
- Particular attention should be paid to the areas where swirl marks are most prevalent, such as - the trunk, roof, and hood.
- To get rid of any soap residues, rinse your car well.
- Use a microfiber towel to dry.
Step 2: Use a clay bar
More is needed to remove all contaminants. You can also get bonded contaminants, such as iron fallout from construction sites or brake dust, which can stick to your paint surface. They can cause more swirl marks in the future. To remove them, you’ll need to use a clay barre.
When claying your vehicle, keep these things in mind:
- You can work in sections of 1ft X1ft (or as small as you like)
- Use clay lubricant with care.
- In straight lines, move the clay bar from left to right.
- Do not apply pressure to the paint, as this can cause damage.
- After claying, rinse the vehicle.
- Use a microfiber towel to dry it.
Use caution when using clay bars. It can damage paint if you have never used clay bars. A professional detailer can also clay your vehicle - without worrying about it.
Step 3: Polish Your Car
The paint will feel and look smooth after you have used a clay bar. It’s now ready to be polished. Polishing can remove swirl marks and give the paint a shiny finish. Start at a slow speed and increase speed as you work.
- Add three to four pea-sized polish dots to the pad.
- Use a clean applicator pad.
- Polishing from the top is better.
- To avoid any damage, move the polisher slowly.
- Applying over swirl marks can cause pressure to increase.
Step 4: Buff Your Car
Buffing can be described as an extension of polishing your car. This helps to blend the polish into your paint and gives your car a smooth finish. You can buff your car with a cloth or a buffer/polisher.
Buffing By Hand
Don’t allow the polish to dry completely after applying it. Wipe off any excess polish using a microfiber towel. Then buff the car to give it a shiny finish. When buffing your car by hand, keep the following in mind:
- Use a microfiber towel or buffing cloth.
- A few microfiber towels and buffing pads are handy.
- Use a flashlight to inspect the paint.
- Polish the area again if you notice swirl marks.
- Continue to buff until you have a shiny finish.
Buffing Using Buffer/Polisher
A mechanical buffer/polisher can also be used. This is an example of a well-respected brand, Dewalt. A random orbital buffer is safer than a variable-speed buffer. Professional detailers should use this buffer because it moves in a circular motion at high speed, which causes its edges to dig into the paint. If misused, this will leave marks on your car. If you’re DIYing the whole thing, a random orbital buffer is your best option.
Here are the steps to create a random orbital buffer.
- Apply some polishing compound to a 1ft X1ft area.
- Before you turn on the buffer, apply a little bit of the polishing pad.
- Move the machine one inch per second.
- You will need to work in 1ft X1ft sections.
- You should make several passes at each section before you move on to the next.
You must be careful. Excessive pressure can cause damage. You can hire a professional detailer to polish your car if you’re not confident doing it. This will save you a lot of time and effort.
Step 5: Wax your car
This is the last step to get rid of swirls. A clear coat protects the paint from dirt and debris by protecting it from polishing, buffing, and claying. A weaker clear coat can lead to contaminants sticking in the paint and causing swirl marks. Waxing strengthens your clear coating and helps to prevent future micro marrings.
When waxing your car, make sure you:
- Use only high-quality automotive wax
- Begin with a little bit of wax.
- Use a few drops of oil or a small amount on the pad.
- You can wax your car in sections.
- Do not leave wax on your car for too long, as it can dry out and become hard.
- Use circular motions to apply the wax.
- Use a microfiber towel to remove any excess wax.
Another tip is to wax your vehicle in an enclosed area. You can use a tent, a carport, or a garage to wax your car. It will protect your car from dirt and other contaminants. These contaminants can get into the wax and cause swirl marks faster than you think.
Second, an open area can make your car extremely hot. Wax will quickly dry if it is applied to hot surfaces. This will stop your car from getting the protection and shine it deserves.
In conclusion
Swirl marks are one the most common defects that car owners will encounter. Swirl marks can quickly contaminate your paintwork and cause costly maintenance. Removing swirl marks is difficult, but it is straightforward. This post will show you how to remove swirls promptly and efficiently from car paint.
You can also let Montana Auto Pros handle the details. Our skilled and experienced team can offer a variety of car detailing services, including removing swirls from car paint. For more information, call 509-881-7576 and contact us online.
Auto Detailing Services in Montana
Call or text to book your appointment for the best Mobile Car Wash & Detail in Helena, MT & the surrounding areas of Montana.